Author: Tom Frampton
Source
View Tom Frampton on Plugin Boutique

ShaperBox 3 Bundle: The Ultimate Rhythmic Powerhouse Elevate your sound design with the ShaperBox 3 Bundle, a must-have toolkit for modern producers. This versatile collection brings together 11 powerful Cableguys effects—including Time, Pitch, Volume, and the new LiquidShaper—into one intuitive, multiband interface. Whether you're looking for precise sidechain ducking, complex rhythmic glitches, or lush analog-style filtering, ShaperBox 3 makes it easy to inject musical motion into any track. Praised by top producers like David Guetta and industry titans like Sound On Sound, it’s the definitive solution for solving mix problems and finding instant inspiration.
Understanding music theory is a game-changer for music producers. While it may seem daunting at first, mastering the basics can elevate your tracks from good to great, helping you create more compelling melodies, harmonies, and rhythms.
In this blog post, we’ll break down essential music theory concepts for modern music. You’ll discover how scales, chords, and rhythms can transform your production process, giving you the tools to craft professional-sounding tracks.
Dive in and unlock the secrets to making your music sound better than ever.

The Basics of Music Theory
Fundamental Concepts
Music theory might seem complex, but its fundamental concepts are straightforward and incredibly useful. At its core, music theory involves understanding notes, scales, and chords. These elements form the building blocks of any piece of music, providing a framework for creating harmonious and engaging tracks.
Importance in Music Production
A solid grasp of these basics is crucial. Knowing how notes interact and how scales create moods can help you avoid clashing sounds and ensure your tracks have a coherent, professional quality. This foundational knowledge allows you to make informed decisions, whether you’re crafting a synth lead, layering pads, or arranging drum patterns.
Real-World Example
Imagine you’re working on a pop track. Understanding scales will help you choose notes that complement each other, preventing dissonance and creating a smooth, pleasant listening experience. For instance, using a minor scale can evoke a more somber and introspective mood, perfect for late-night club vibes.
By mastering these basics, you’ll have the tools to start crafting more polished and professional-sounding tracks. In the next sections, we’ll look at specific elements like scales, modes, and chord progressions, giving you actionable insights to level up your music production skills.

Scales and Modes
Different Types of Scales
Scales are a series of notes that provide the foundation for melodies and harmonies. The most commonly used scales are major, minor, and pentatonic. Each scale has its own unique sound and emotional impact.
- Major Scales: These scales have a happy and uplifting sound, often used in genres like pop and house music.
- Minor Scales: These scales convey a more somber and melancholic mood, making them ideal for genres like ballads and deep house.
- Pentatonic Scales: These scales, with only five notes, are versatile and can fit into various styles, from hip-hop to ambient music.
Introduction to Modes
Modes are variations of scales that start on different notes but use the same set of pitches. Each mode has a distinctive sound and can be used to evoke specific emotions.
- Ionian: Also known as the major scale, it’s bright and happy.
- Dorian: Has a jazzy, bluesy feel, often used in funk and progressive house.
- Phrygian: Dark and exotic, perfect for adding tension in techno and trance.
- Lydian: Dreamy and ethereal, great for ambient and chill-out tracks.
- Mixolydian: Bluesy and slightly unstable, common in rock and electronic dance music.
- Aeolian: The natural minor scale, used widely across many electronic genres.
- Locrian: Rare and dissonant, used for experimental and avant-garde music.

Real-World Example
In a hip-hop track, you might use a pentatonic scale to create catchy hooks and riffs. This scale’s simplicity and versatility allow you to craft memorable melodies that stand out. For instance, using a minor pentatonic scale can add a gritty, urban feel to your beats.
Practical Tips
Using scales and modes effectively can transform your music. Here are some practical tips:
- Create Emotional Depth: Choose scales that match the emotional tone you want for your track. A minor scale can add depth and introspection, while a major scale can bring a sense of joy and energy.
- Experiment with Modes: Try different modes to see how they change the feel of your music. For example, switching from Ionian to Dorian can add a jazzy, intriguing vibe.
- Layering and Harmony: Use scales to build harmonious layers. By sticking to the same scale, you ensure all elements of your track work well together, avoiding dissonance.
A Helpful Plugin
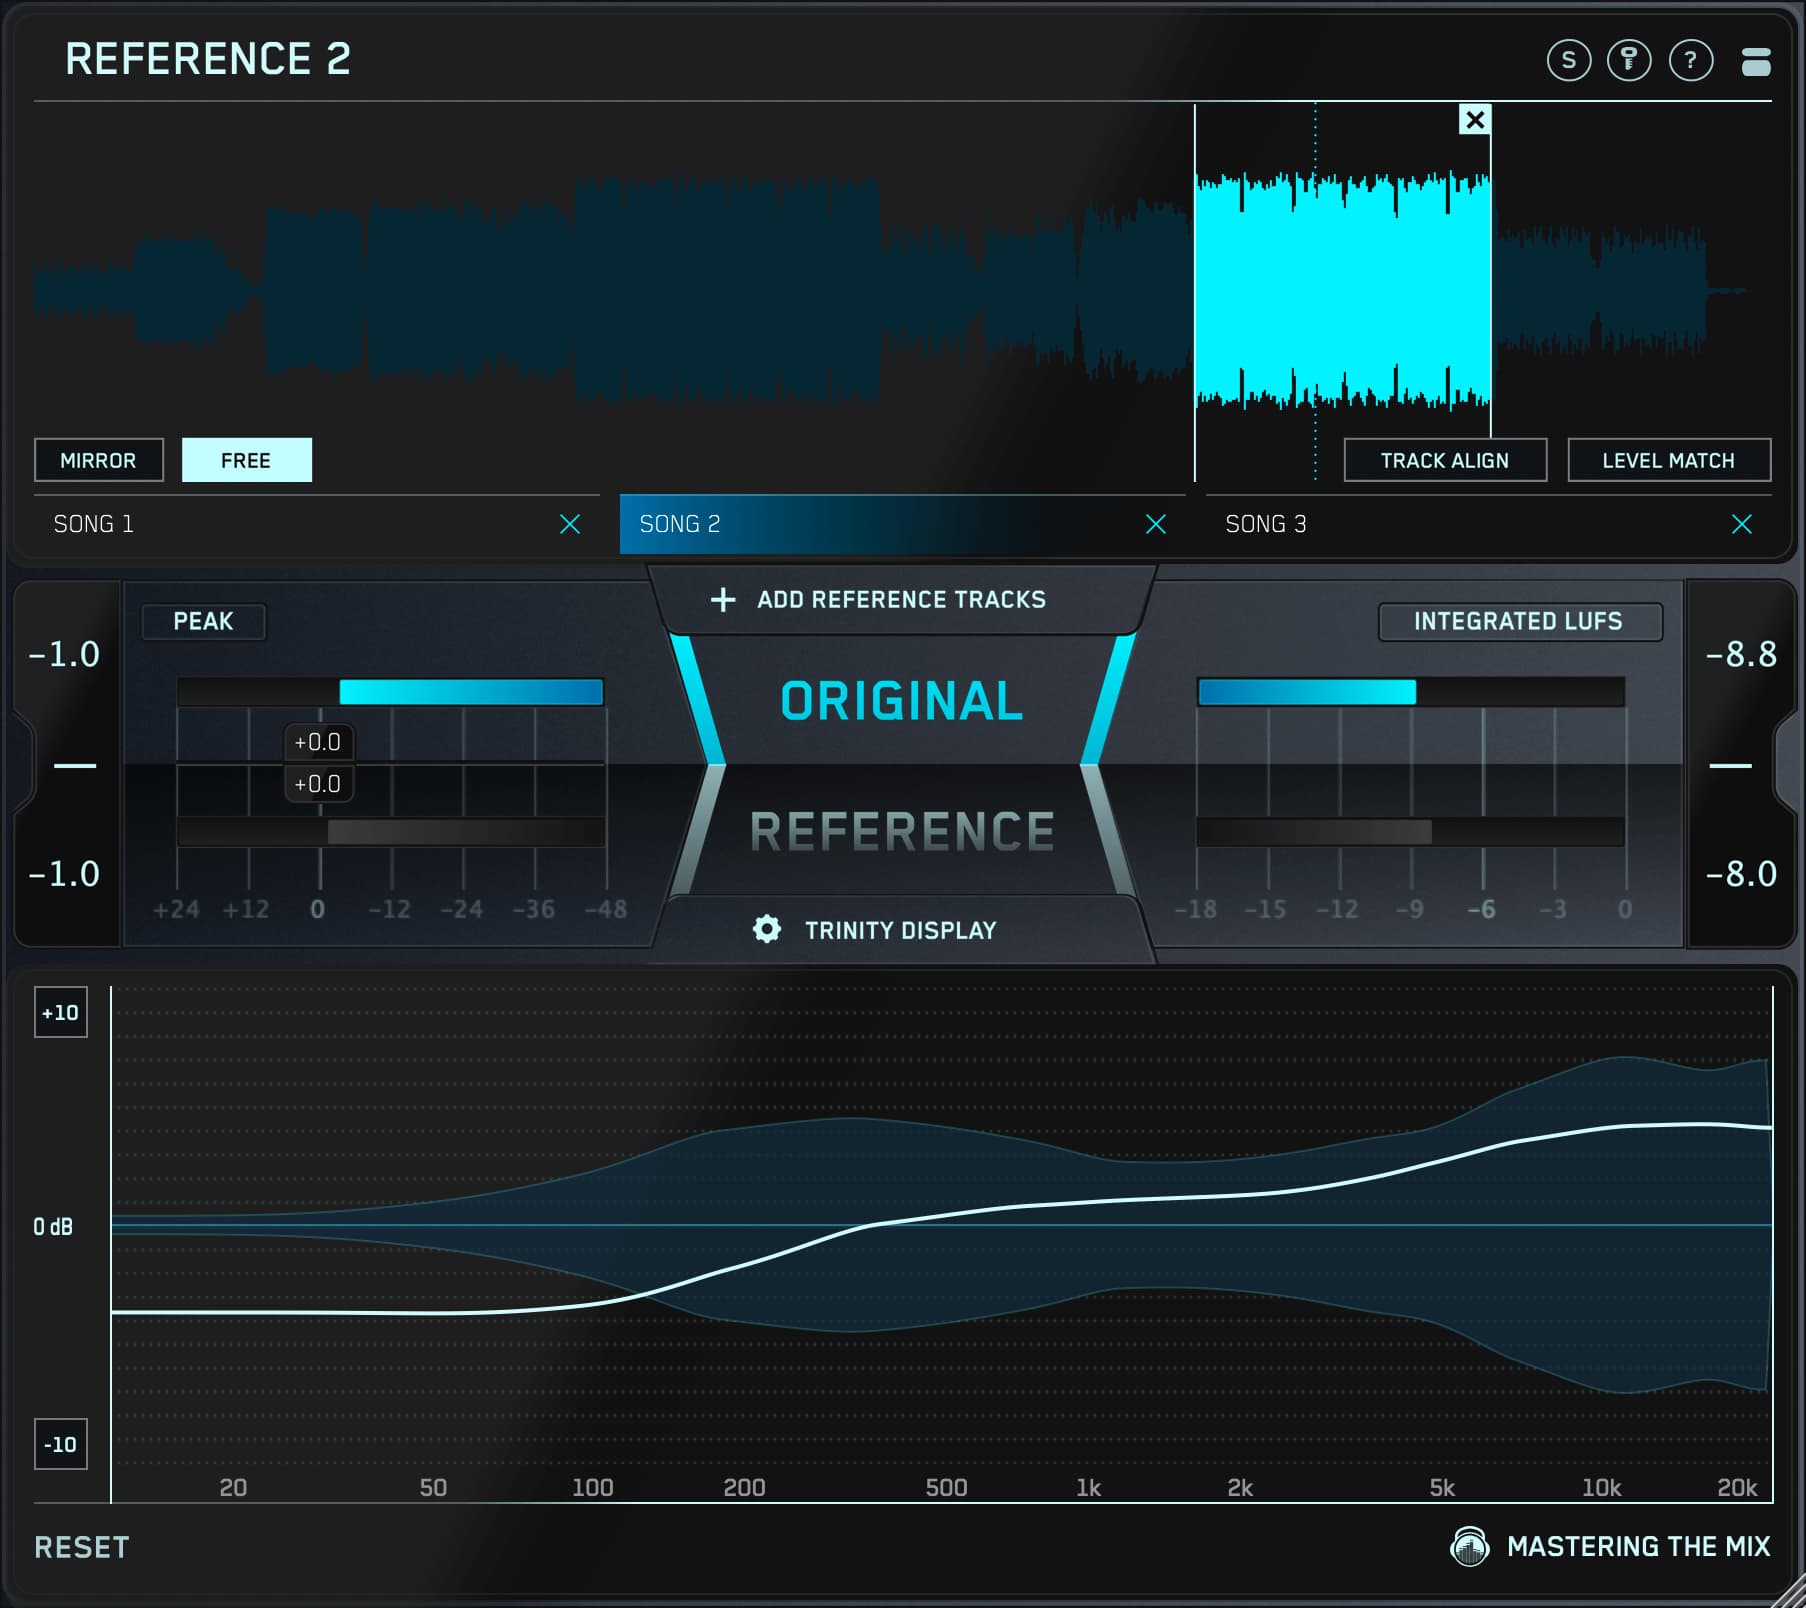
To refine your understanding and application of scales and modes, REFERENCE can be an invaluable tool. It allows you to compare your tracks to professional references, ensuring your use of scales and modes meets industry standards.
REFERENCE provides a suite of features designed to enhance your production process:
- Automatic Loudness Matching: REFERENCE matches the perceived loudness of your track with your reference tracks, ensuring a fair comparison. This feature is crucial as our perception of tonal balance changes with volume.
- Trinity Display: This unique visualizer shows how your tonal balance, stereo spread, and punch compare to your reference tracks. The white EQ line indicates the exact EQ adjustment needed to match your reference, taking out the guesswork.
- Easy A/B Comparison: Drag and drop your favorite songs into REFERENCE, and easily switch between your mix and the reference track. This helps you identify and correct any discrepancies in real-time.
Here are some actionable steps to use REFERENCE effectively:
- Load Your Reference Tracks: Choose a few professionally mixed tracks in the same genre and style as your project. Load them into REFERENCE to provide a benchmark for your mix.
- Analyze Your Mix: Use the Trinity Display to compare the tonal balance, stereo spread, and dynamic punch of your mix with your reference tracks. Look for any areas where your mix deviates significantly from the reference.
- Make Informed Adjustments: Follow the visual feedback to make precise EQ adjustments. For example, if the low-end of your mix is lacking compared to the reference, use REFERENCE’s suggestions to boost the appropriate frequencies.
- Iterate and Fine-Tune: Continuously compare your mix to your references as you make adjustments. This iterative process helps ensure that your track maintains a professional sound throughout the production process.
By incorporating REFERENCE into your workflow, you can achieve a polished, industry-standard sound that stands up to professional mixes.
In the next section, we’ll explore chord progressions, another vital aspect of music theory that can add richness and complexity to your music productions. Understanding how to create and use chord progressions effectively will further enhance the harmonic foundation of your tracks.
Chord Progressions
Formation of Chords
Chords are combinations of two or more notes played simultaneously, creating harmony. Understanding how to form chords is essential for crafting rich and engaging music. At the basic level, chords are built from scales. For instance, a major chord consists of the first, third, and fifth notes of the major scale, while a minor chord includes the first, flattened third, and fifth notes of the minor scale.
Role of Chords in Music
Chords provide the harmonic foundation of your track, supporting melodies and giving them context. They help establish the mood and drive the progression of your music. In music, chords can add depth and emotional resonance, making your tracks more compelling and memorable.
Common Chord Progressions
Certain chord progressions are frequently used in music due to their pleasing sound and emotional impact. For example:
- I-IV-V Progression: This classic progression, using the first, fourth, and fifth chords of the scale, creates a sense of resolution and completeness. It’s widely used in genres like house and pop.
- ii-V-I Progression: Common in jazz and more sophisticated electronic music, this progression brings a sense of movement and sophistication.
- vi-IV-I-V Progression: Known as the “pop-punk progression,” it’s popular in many genres for its catchy and uplifting feel.

Techniques for Creating Your Own Progressions
Creating your own chord progressions involves experimentation and understanding the emotional impact of different chords. Here are some techniques:
- Start Simple: Begin with basic triads (three-note chords) and then experiment with adding extensions like sevenths, ninths, and elevenths to add complexity and color.
- Use Inversions: Inversions are chords played with notes in different orders. They can make transitions smoother and add variety.
- Experiment with Rhythm: The rhythm and timing of your chords can significantly impact the feel of your track. Try syncopating chord changes or playing chords off the beat to create interest.

Real-World Example
In a pop track, using a I-IV-V progression can create a satisfying sense of resolution. For example, if you’re working in C major, your chords would be C major (I), F major (IV), and G major (V). This progression can form the backbone of your song, providing a strong and familiar harmonic structure.
A Helpful Plugin
For perfecting your chord progressions and ensuring they blend seamlessly into your mix, MIXROOM is a powerful tool. It helps you fine-tune the mid and high frequencies of your harmonies, ensuring they stand out and complement the other elements of your track.
MIXROOM provides precise control over the frequency spectrum, allowing you to target specific ranges that may need adjustment. For example, if your chords are getting lost in the mix, you can use MIXROOM to boost the mid frequencies slightly, giving them more presence. Conversely, if your harmonies are too harsh or piercing, you can gently attenuate the high frequencies to smooth out the sound.
Here are some actionable steps to use MIXROOM effectively:
- Identify Problem Areas: Start by playing your track and listening for any chords or harmonies that don’t sit well in the mix. Use MIXROOM’s visual feedback to pinpoint problematic frequencies.
- Adjust the EQ: Use the intuitive interface to make precise adjustments. For instance, if your chord progression sounds muddy, try reducing the low-mids slightly.
- Compare with Reference Tracks: Load a reference track into MIXROOM to compare your mix with a professionally produced track. This will help you identify any discrepancies in the frequency balance and make more informed decisions.
- Fine-Tune the Output: After making adjustments, listen to the track in different playback environments (e.g., studio monitors, headphones, car speakers) to ensure the changes translate well across various systems.
By following these steps, you can ensure your chord progressions and harmonies are well-balanced and contribute positively to the overall mix.
In the next section, we’ll delve into melody and harmony, exploring how these elements can work together to enhance your music productions. Understanding the interplay between melody and harmony is crucial for creating tracks that are both engaging and professionally polished. We’ll provide practical tips and techniques to help you craft memorable melodies and rich harmonies that resonate with your listeners.
Melody and Harmony
Relationship Between Melody and Harmony
Melody and harmony are two sides of the same coin in music production. While the melody is the main tune that listeners hum along to, harmony consists of the chords and other supporting notes that enrich the melody. Understanding the relationship between these two elements is key to creating cohesive and emotionally resonant music.
Writing Catchy Melodies
Crafting a memorable melody involves creativity and a few fundamental techniques:
- Repetition and Variation: Repeating a melodic phrase can make it more memorable, while subtle variations keep it interesting.
- Contour and Movement: A good melody often has a clear shape or contour, moving smoothly between notes rather than jumping erratically.
- Rhythmic Interest: Varying the rhythm of your melody can add excitement and keep the listener engaged.

Harmony for Depth and Interest
Harmony adds layers to your music, making it fuller and more complex. Here’s how to effectively use harmony in your tracks:
- Chordal Harmony: Use chords to support your melody. Ensure that your chords change in sync with your melody to maintain harmonic coherence.
- Countermelodies: Introduce secondary melodies that complement the main melody. These countermelodies should enhance the main tune without overshadowing it.
- Harmonic Rhythm: The rate at which chords change can affect the energy and mood of your track. Faster changes can create excitement, while slower changes can add a sense of space and relaxation.
Real-World Example
Consider a jazz fusion track. Start with a simple melody in a minor scale for a deeper, more emotional vibe. Add harmonic support with minor chords, ensuring they align with the melodic notes. To add depth, introduce a countermelody in the higher register, perhaps using a plucked synth sound. This approach not only enriches the track but also keeps it engaging through its various sections.

Rhythm and Groove
Importance of Rhythm in Music
Rhythm is the heartbeat of any track. It provides the structure and drive that keep listeners engaged and moving. A well-crafted rhythm can elevate a track, making it irresistible on the dance floor or compelling in a chill-out session.
Basic Rhythmic Concepts
Understanding basic rhythmic concepts is essential for creating effective grooves:
- Time Signatures: Most music is in 4/4 time, meaning there are four beats per measure. However, experimenting with different time signatures, like 3/4 or 6/8, can add unique feels to your tracks.
- Beats and Bars: Beats are the individual pulses in a rhythm, while bars group these beats into repeating units. Knowing how to manipulate beats and bars helps in creating dynamic and interesting patterns.
- Syncopation: This involves placing accents on off-beats or unexpected parts of the rhythm, adding a sense of surprise and movement.
Techniques for Creating Compelling Grooves
Creating a groove that captures listeners’ attention involves several techniques:
- Layering Percussion: Start with a solid kick and snare pattern, then layer additional percussive elements like hi-hats, claps, and shakers. Each layer should complement the others, creating a cohesive and intricate rhythm.
- Dynamic Variations: Introduce subtle variations in your rhythm patterns. Small changes in velocity, timing, and sound selection can make a significant impact on the overall groove.
- Using Ghost Notes: These are quieter, less prominent hits that add texture and depth to your rhythm. They can be used to fill in gaps and keep the beat flowing naturally.
Real-World Example
In a reggae track, you might start with a steady off-beat rhythm. Add syncopated hi-hats and claps to create movement and energy. Layer in ghost notes on the snare to add subtle complexity. Experiment with different percussive sounds to find a combination that drives the groove while maintaining cohesion.
A Helpful Plugin
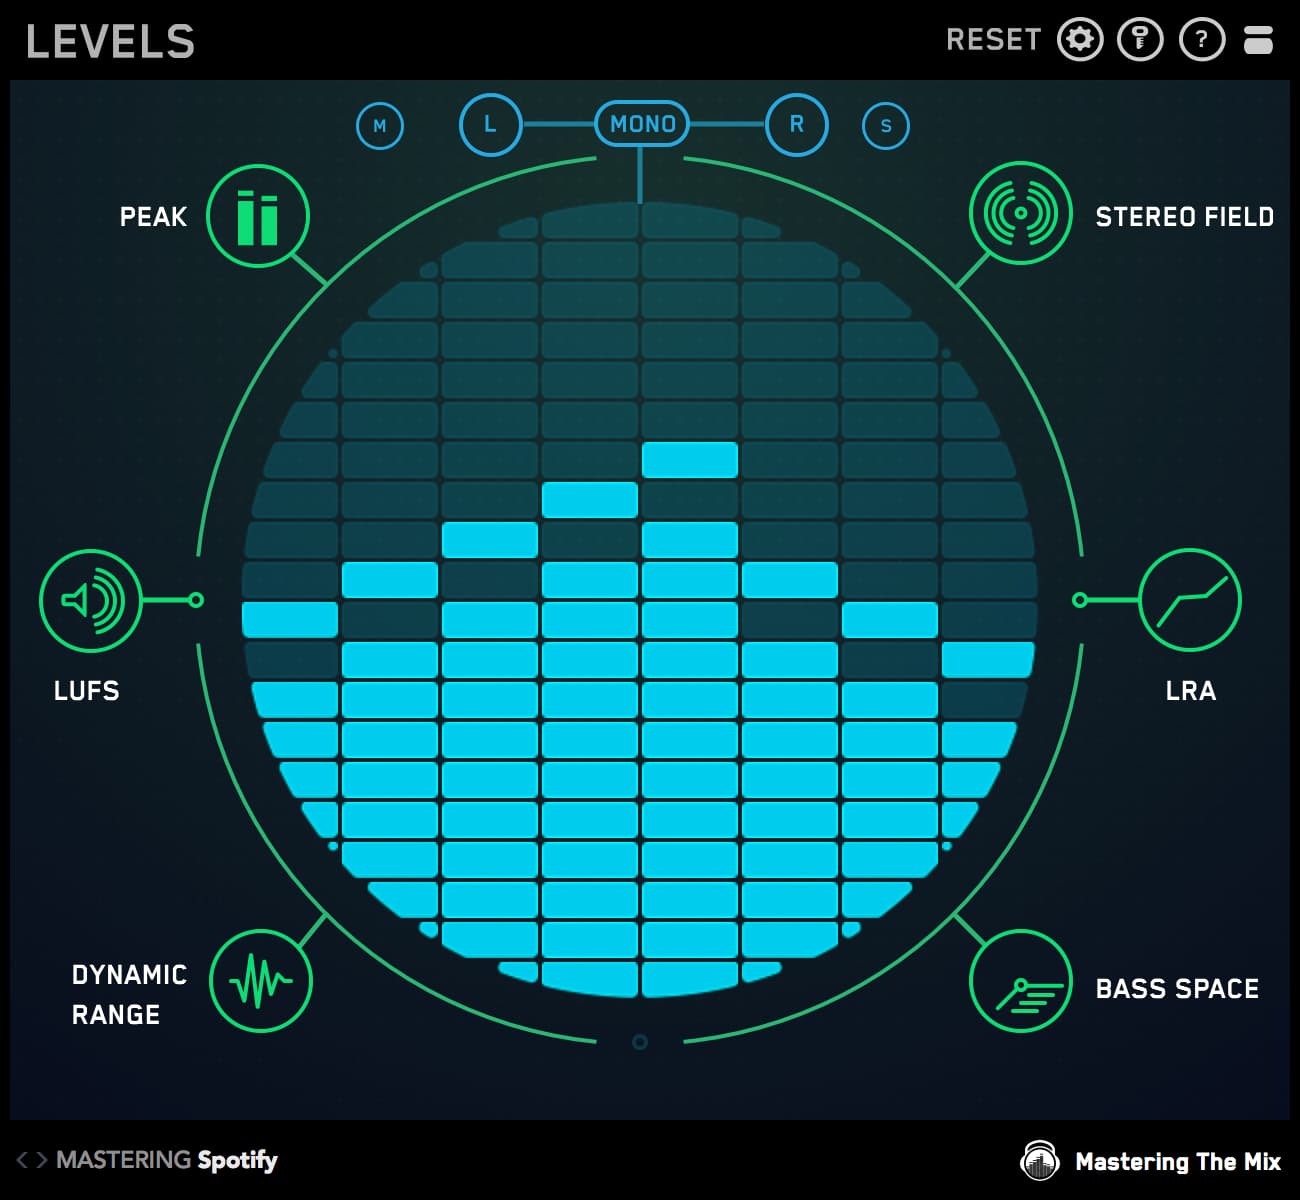
To ensure your rhythm and groove are perfectly balanced and impactful, use LEVELS. This plugin helps you monitor and adjust your track’s dynamics, ensuring your beats hit hard without distorting and your groove remains tight and engaging.
LEVELS offers a range of features designed to optimize your rhythm and groove:
- Headroom Control: LEVELS allows you to monitor the headroom of your track, ensuring that your peaks do not exceed the recommended levels and avoiding unwanted distortion.
- Dynamic Range Monitoring: The plugin helps you maintain the dynamic range of your music, ensuring that your beats and grooves have the right amount of punch and energy.
- Stereo Field Analysis: LEVELS provides a visual representation of your track’s stereo field, allowing you to see how wide or narrow your mix is and make adjustments to ensure a balanced stereo image.
- Bass Space: This feature helps you ensure that your low-end elements, like the kick and bass, are well-balanced and not conflicting, creating a clean and powerful foundation for your track.

Here are some actionable steps to use LEVELS effectively:
- Set Up Your Mix: Start by loading LEVELS onto your master channel. Play through your track and observe the different meters and displays provided by the plugin.
- Adjust Headroom: Ensure your track has sufficient headroom by adjusting the levels of individual elements or using a gain plugin. Aim for peaks around -6dB to -3dB to allow room for mastering.
- Monitor Dynamic Range: Use the dynamic range meter to check if your track is too compressed or too dynamic. Make adjustments to your compression settings to achieve a balanced dynamic range.
- Analyze Stereo Field: Check the stereo field display to ensure your mix is not overly wide or too narrow. Use panning and stereo imaging tools to create a balanced stereo image.
- Balance Low-End: Use the bass space feature to make sure your kick and bass are not overlapping excessively. Adjust EQ and sidechain compression settings to clean up the low-end.
By following these steps and utilizing LEVELS, you can ensure that your rhythm and groove are well-balanced, impactful, and translate well across different listening environments.
In the next section, we’ll dive into advanced music theory concepts like counterpoint and modulation, showing how these techniques can add sophistication and depth to your music productions. These advanced techniques will help you take your tracks to the next level, adding complexity and interest to your compositions.
Advanced Concepts
Introduction to Counterpoint
Counterpoint is the art of combining distinct melodic lines in a musical composition. Using counterpoint can add complexity and interest to your tracks. It involves creating multiple melodies that are harmonically interdependent yet independent in rhythm and contour.
- Horizontal and Vertical Harmony: Think of counterpoint as both horizontal (melodic lines moving independently) and vertical (harmonic intervals formed between lines). This dual perspective helps create rich, intricate textures in your music.
- Contrasting Motion: Employ contrary, parallel, and oblique motion between melodies to maintain interest. Contrary motion, where one melody ascends while the other descends, is particularly effective for creating dynamic interplay.

Modulation Techniques
Modulation refers to changing the key within a piece of music. It can bring freshness and excitement to your tracks by shifting the tonal center, thereby providing a new perspective on the existing material.
- Pivot Chords: Use chords common to both the original key and the new key to make smooth transitions. This method ensures that the modulation feels natural and not jarring.
- Direct Modulation: Shift directly to a new key without transitional chords. This technique can be striking and is often used in music to introduce new sections with a dramatic impact.
Practical Tips for Using Advanced Concepts
- Layering Counterpoint: Start with a primary melody and layer additional melodies that complement it. Use MIDI to experiment with different note sequences and rhythms until you find combinations that work harmoniously.
- Applying Modulation: Decide where modulation would enhance your track, such as transitioning from a verse to a chorus. Use pivot chords to facilitate a smooth key change, or opt for direct modulation for a bold effect.
Real-World Example
In a progressive rock track, you might use counterpoint by introducing a secondary guitar melody that weaves around the main lead. As the track builds, employ modulation to shift the key up a whole step, injecting new energy into the climax of the song. This technique keeps listeners engaged and adds a professional touch to your production.

Practical Application and Workflow
Integrating Music Theory into Your Workflow
Incorporating music theory into your production process can enhance creativity and efficiency. Start with a clear understanding of the basic concepts and gradually apply more advanced techniques as you become comfortable.
- Planning Your Track: Outline your track’s structure before diving into production. Decide on the key, tempo, and general vibe. This planning helps ensure your musical ideas align and flow naturally.
- Using MIDI Tools: MIDI controllers and software can make experimenting with music theory concepts easier. Use MIDI to quickly test different chord progressions, melodies, and rhythms, and make adjustments on the fly.
Tips for Staying Creative
While music theory provides a framework, maintaining creativity is crucial. Here are some tips to balance theoretical knowledge with creative freedom:
- Break the Rules: Once you understand the basics, don’t be afraid to break them. Experiment with unconventional scales, chord progressions, and rhythms to develop a unique sound.
- Improvise: Use live MIDI recording to capture spontaneous ideas. This method can yield unexpected and exciting results, which you can refine and incorporate into your track.
- Layer and Texture: Combine different instruments and sounds to create rich textures. Use layering to add depth and complexity, ensuring each element complements the overall composition.

Real-World Example
When producing a deep house track, start by setting your DAW to the desired tempo and key. Use a MIDI keyboard to play around with different chord progressions until you find one that sets the right mood. Record a simple melody line and then layer additional harmonies and rhythmic elements. Experiment with different textures and sounds, using MIDI tools to adjust and fine-tune as you go. This iterative process allows for both structured composition and creative exploration.
Conclusion
Understanding and applying music theory can significantly enhance your music production. We’ve covered the basics of music theory, including scales, modes, chord progressions, melody, and harmony.
We also explored the importance of rhythm and groove, and advanced concepts like counterpoint and modulation. By integrating these elements into your workflow, you can create more compelling and professional-sounding tracks.
Experiment!
Music theory provides a strong foundation, but creativity and experimentation are equally important. Don’t be afraid to break the rules, try new techniques, and develop your unique sound. Use the tools and techniques discussed to elevate your productions and make your music stand out.
Next Steps:
Ready to take your music to the next level? Download the free trials of Mastering The Mix plugins to refine and perfect your tracks.
Sign up for our newsletter for more tips and tutorials, and follow us on social media for ongoing education and inspiration.
Let’s make your music sound better than ever!


