ShaperBox 3 Bundle: The Ultimate Rhythmic Powerhouse Elevate your sound design with the ShaperBox 3 Bundle, a must-have toolkit for modern producers. This versatile collection brings together 11 powerful Cableguys effects—including Time, Pitch, Volume, and the new LiquidShaper—into one intuitive, multiband interface. Whether you're looking for precise sidechain ducking, complex rhythmic glitches, or lush analog-style filtering, ShaperBox 3 makes it easy to inject musical motion into any track. Praised by top producers like David Guetta and industry titans like Sound On Sound, it’s the definitive solution for solving mix problems and finding instant inspiration.
Have you ever had that annoying problem where certain bass notes stick out of the mix? It’s super annoying, makes your music sound weird and can cause distortion during mastering. Nightmare.
The kick and bass dynamics are pivotal in setting the foundation of a track, yet they often compete for space, leading to a cluttered mix that lacks clarity and might consume excessive headroom.
This competition not only muddies the overall sound but can also lead to unwanted distortion when compressors and limiters work overtime to balance the mix.
A great tool to solve this is RESO. RESO’s primary function is to remove unwanted resonances (usually in the mid and high frequencies) from audio. It can also be used to address these low-frequency challenges with precision and transparency. RESO can:
Control Overpowering Bass Notes: Specifically targeting notes that overshadow the mix, helping conserve headroom.
Process Transparently: Adjusts only the problematic notes/frequencies without affecting the entire signal.
Enhance Mix Clarity: By controlling the low-end, RESO helps in achieving a cleaner mix, ensuring that every element shines through.
Through this guide, we’ll delve into how RESO can be utilized to fine-tune kick and bass frequencies individually and on the master channel, targeting specific bass notes that may cause issues within the mix.
Focusing on this selective frequency adjustment allows a mix to breathe, maintaining energy and clarity without unnecessary compression.
Understanding the Low-End
In the realm of music production, mastering the low-end frequencies is akin to walking a tightrope. The kick and bass form the backbone of most genres, providing rhythm and depth. However, without careful control, they can easily overpower a mix or disappear entirely, resulting in a lack of punch and definition. Here, we explore the dynamics of kick and bass, their common problems, and the role of RESO in achieving harmonic balance.
The Dynamics of Kick and Bass
Kick: Serves as the rhythmic foundation. Its frequencies can range from sub-bass to low-mids, necessitating precise control to avoid overlapping with bass.
Bass: Provides melodic rhythm and warmth. It occupies similar frequencies to the kick but often requires a broad frequency spectrum to fully articulate notes and harmonics.
When these two compete for the same frequency space, it not only diminishes their individual presence but also compromises the clarity of the entire mix.
Common Problems in Low-End Management
The most significant issues producers face in the low-end spectrum include:
Overpowering Bass Frequencies: Bass notes that are too dominant can mask other frequencies, making the mix feel unbalanced and muddy.
Loss of Headroom: Excessive low-end energies consume headroom, which can lead to unintentional distortion during compression and limiting stages.
Frequency Masking: When kick and bass compete for the same frequencies, it causes masking, where one sound obscures the other, leading to a loss of punch and definition.
RESO steps in as a strategic tool designed to resolve these low-end issues transparently. With its ability to dynamically control frequencies, RESO allows producers to:
Identify and Isolate: Pinpoint specific problem frequencies without affecting the entire frequency spectrum.
Control with Precision: Apply transparent adjustments to remove or reduce excessive energies only in problematic notes or bands.
Maintain Natural Sound: Tackle low-end issues without the unnatural side-effects typical of heavy compression or EQ notching.
By understanding the intricate relationship between the kick and bass and their common challenges, producers can leverage RESO to unlock the potential for a clean, powerful, and dynamic low-end in their mixes.
RESO Fundamentals
At its core, RESO is a dynamic resonance suppressor that enables producers to manage low-end frequencies with unparalleled precision and transparency. This section delves into the key features of RESO, demonstrating how to harness its power for clean, powerful mixes.
An Overview of RESO
RESO stands out in the crowded field of audio plugins with its ability to:
Automatically Detect Problematic Frequencies: Through intelligent analysis, identifying frequencies that cause muddiness or imbalance.
Apply Targeted Adjustments: Allowing for the precise reduction of specific frequency bands without altering the overall character of the mix.
Maintain Musical Integrity: By focusing on problematic notes instead of applying broad-spectrum dynamics processing.
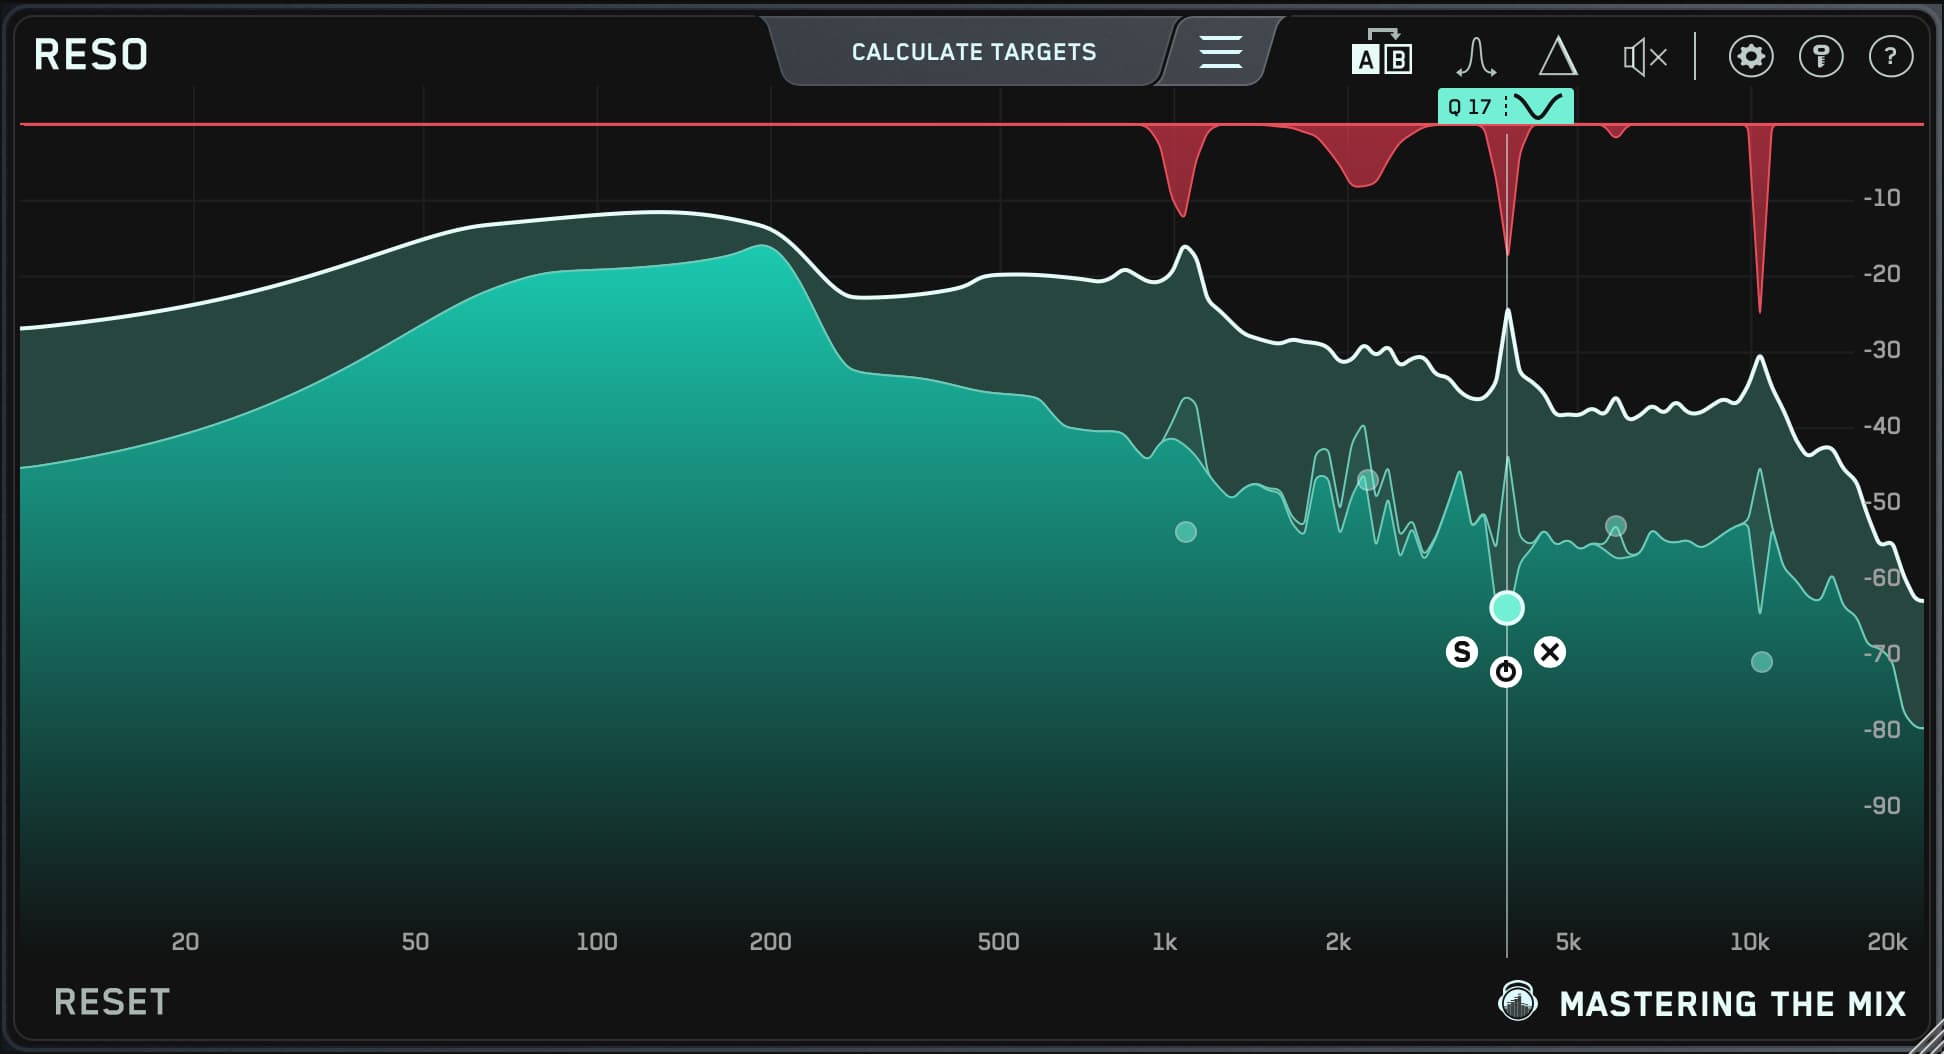
Node Creation in RESO
Creating and positioning nodes in RESO is at the heart of its functionality. Here’s a step-by-step guide on managing nodes:
Step 1: Analyze your track and let RESO identify the problematic frequencies.
Step 2: Manually create nodes by clicking on the identified frequencies within the interface.
Step 3: Adjust the position of each node to determine the level of suppression or enhancement needed for each frequency, effectively controlling the power and presence of specific bass notes.
The position of the node is critical:
A lower vertical position applies more suppression, controlling overly dominant frequencies.
An higher vertical position is less invasive, allowing for a more natural balance in the mix.
Transparency and Precision
RESO’s unparalleled transparency is what sets it apart from traditional EQs and compressors. It achieves this through:
Selective Processing: Only the frequencies that exceed the threshold set by the node are processed, leaving the rest of the mix untouched.
Adaptive Algorithms: The processing dynamically adapts to the music, ensuring a natural and musical outcome.
High-Quality Filters: Tailored specifically for low-frequency management without introducing artifacts or phase issues.
Understanding the fundamentals of RESO is crucial for harnessing its full potential. Whether adjusting the low-end on individual tracks or the master channel, RESO offers a level of control and transparency unmatched by traditional mixing tools.
When it comes to achieving a powerful and balanced low-end in your mix, treating the kick and bass individually with RESO can make a substantial difference. This section provides actionable instructions on applying RESO to refine the low-end frequencies of these crucial elements.
By default, RESO is set to ignore resonances below 500Hz. You can change this in settings if you want to use RESO’s automatic ‘Calculate Targets’ feature on individual channels. Turning this on will help you find any disproportionate notes in your low-end.
Controlling Kick Frequencies
The kick drum is pivotal in driving the rhythm and energy of a track. Instead of applying broad-spectrum EQ adjustments, use RESO to tailor the kick’s low-end with precision:
Step 1: Analyze – Insert RESO on your kick track and play through the loudest section of your song.
Step 2: Identify Resonances – Look for frequencies that overpower or muddy the sound. RESO’s visual interface makes it easy to spot these problematic areas.
Step 3: Create Nodes – Manually create suppression nodes at these frequencies. Adjust the threshold to ensure only the excessively loud frequencies are targeted.
This will control the low-end of the track. Audio that surpasses the nodes position will be controlled.
Pro Tip: For kicks, focusing on the 40Hz to 100Hz range often addresses common issues without sacrificing the punch or depth.
Taming Bass Levels
Bass guitar or synth lines provide warmth and groove but can quickly dominate a mix if not properly managed. Use RESO to balance the bass:
Step 1: Single Out Problematic Notes – Play your track and identify bass notes that jump out or cause muddiness.
Step 2: Apply Targeted Suppression – Place nodes on these specific notes or frequencies. Adjust the nodes to suppress only the excess energy.
Step 3: Fine-Tune – Adjust the Q factor to be broad enough to catch the note but not so wide as to affect the adjoining frequencies undesirably.
Practical Example: If a particular bass note overwhelms the mix at 80Hz, place a node at this frequency and set it to suppress the note level to blend seamlessly with the rest of the track.
Using RESO on Individual Tracks – The Benefits
Clarity: By controlling specific problematic frequencies, the overall mix becomes clearer and more defined.
Headroom: Suppressing overpowering low-end frequencies conserves headroom, reducing the workload on compressors and limiters.
Mix Balance: Achieving a balanced interaction between the kick and bass enhances the groove and drive of the track.
By applying RESO meticulously to individual kick and bass tracks, producers can sculpt a tight, cohesive low-end that supports rather than overwhelms the mix. This targeted approach facilitates a mix that is dynamic, vibrant, and harmonically rich.
While treating individual tracks with RESO is crucial, applying it on the master channel can bring coherence and overall polish to the low-end of your entire mix. This section guides you through the techniques of utilizing RESO during the mastering process to control the low-end uniformly across the track.
Applying RESO on the Master Channel
Using RESO on the master channel offers a last chance to fine-tune the low-end before finalizing your track:
Step 1: Initiate RESO – After completing the mix, insert RESO on the master channel.
Step 2: Global Analysis – Play the track through its most dynamic sections, allowing RESO to identify the overall low-end balance.
Step 3: Set Targeted Nodes – Look for peaks in the low-end that could potentially overpower the mix or cause muddiness when mastering.
Remember: Mastering adjustments are more subtle than mixing. Small tweaks can have a significant impact on the overall sound.
Balancing Low-End Dynamics
Striking a perfect balance in the low-end during mastering is essential for a professional sounding track:
Subtle Adjustments: Use RESO to make slight reductions on overpowering low-end frequencies, preserving the track’s energy while ensuring clarity.
Uniformity: Adjust the overall low-end to achieve uniformity across the track, ensuring the mix translates well on various sound systems.
Mastering Tips with RESO
Here are some essential tips for mastering low-end frequencies with RESO:
Avoid Overprocessing: Aim for transparency. Overapplication can flatten the dynamics, losing the track’s vitality.
Respect the Mix: Ensure any adjustments made with RESO respect the original intentions of the mix. Maintain the balance established during the mixing phase.
Reference and Revise: Continuously A/B test with professional references to ensure your low-end stands up to industry standards.
Mastering with RESO offers a final safeguard against common low-end pitfalls, ensuring your track’s low frequencies are controlled, balanced, and ready for public listening. By integrating RESO into your mastering chain, you provide your music with the best possible foundation, guaranteeing its readiness for any listening environment.
Perfecting with REFERENCE
Mastering the low-end with RESO lays the groundwork for a polished mix, but how do you ensure your adjustments align with professional standards? This is where REFERENCE by Mastering The Mix comes into play. This section explains how to utilize REFERENCE alongside RESO for optimal low-end management, drawing direct comparisons to industry-leading tracks.
Utilizing REFERENCE for Comparison
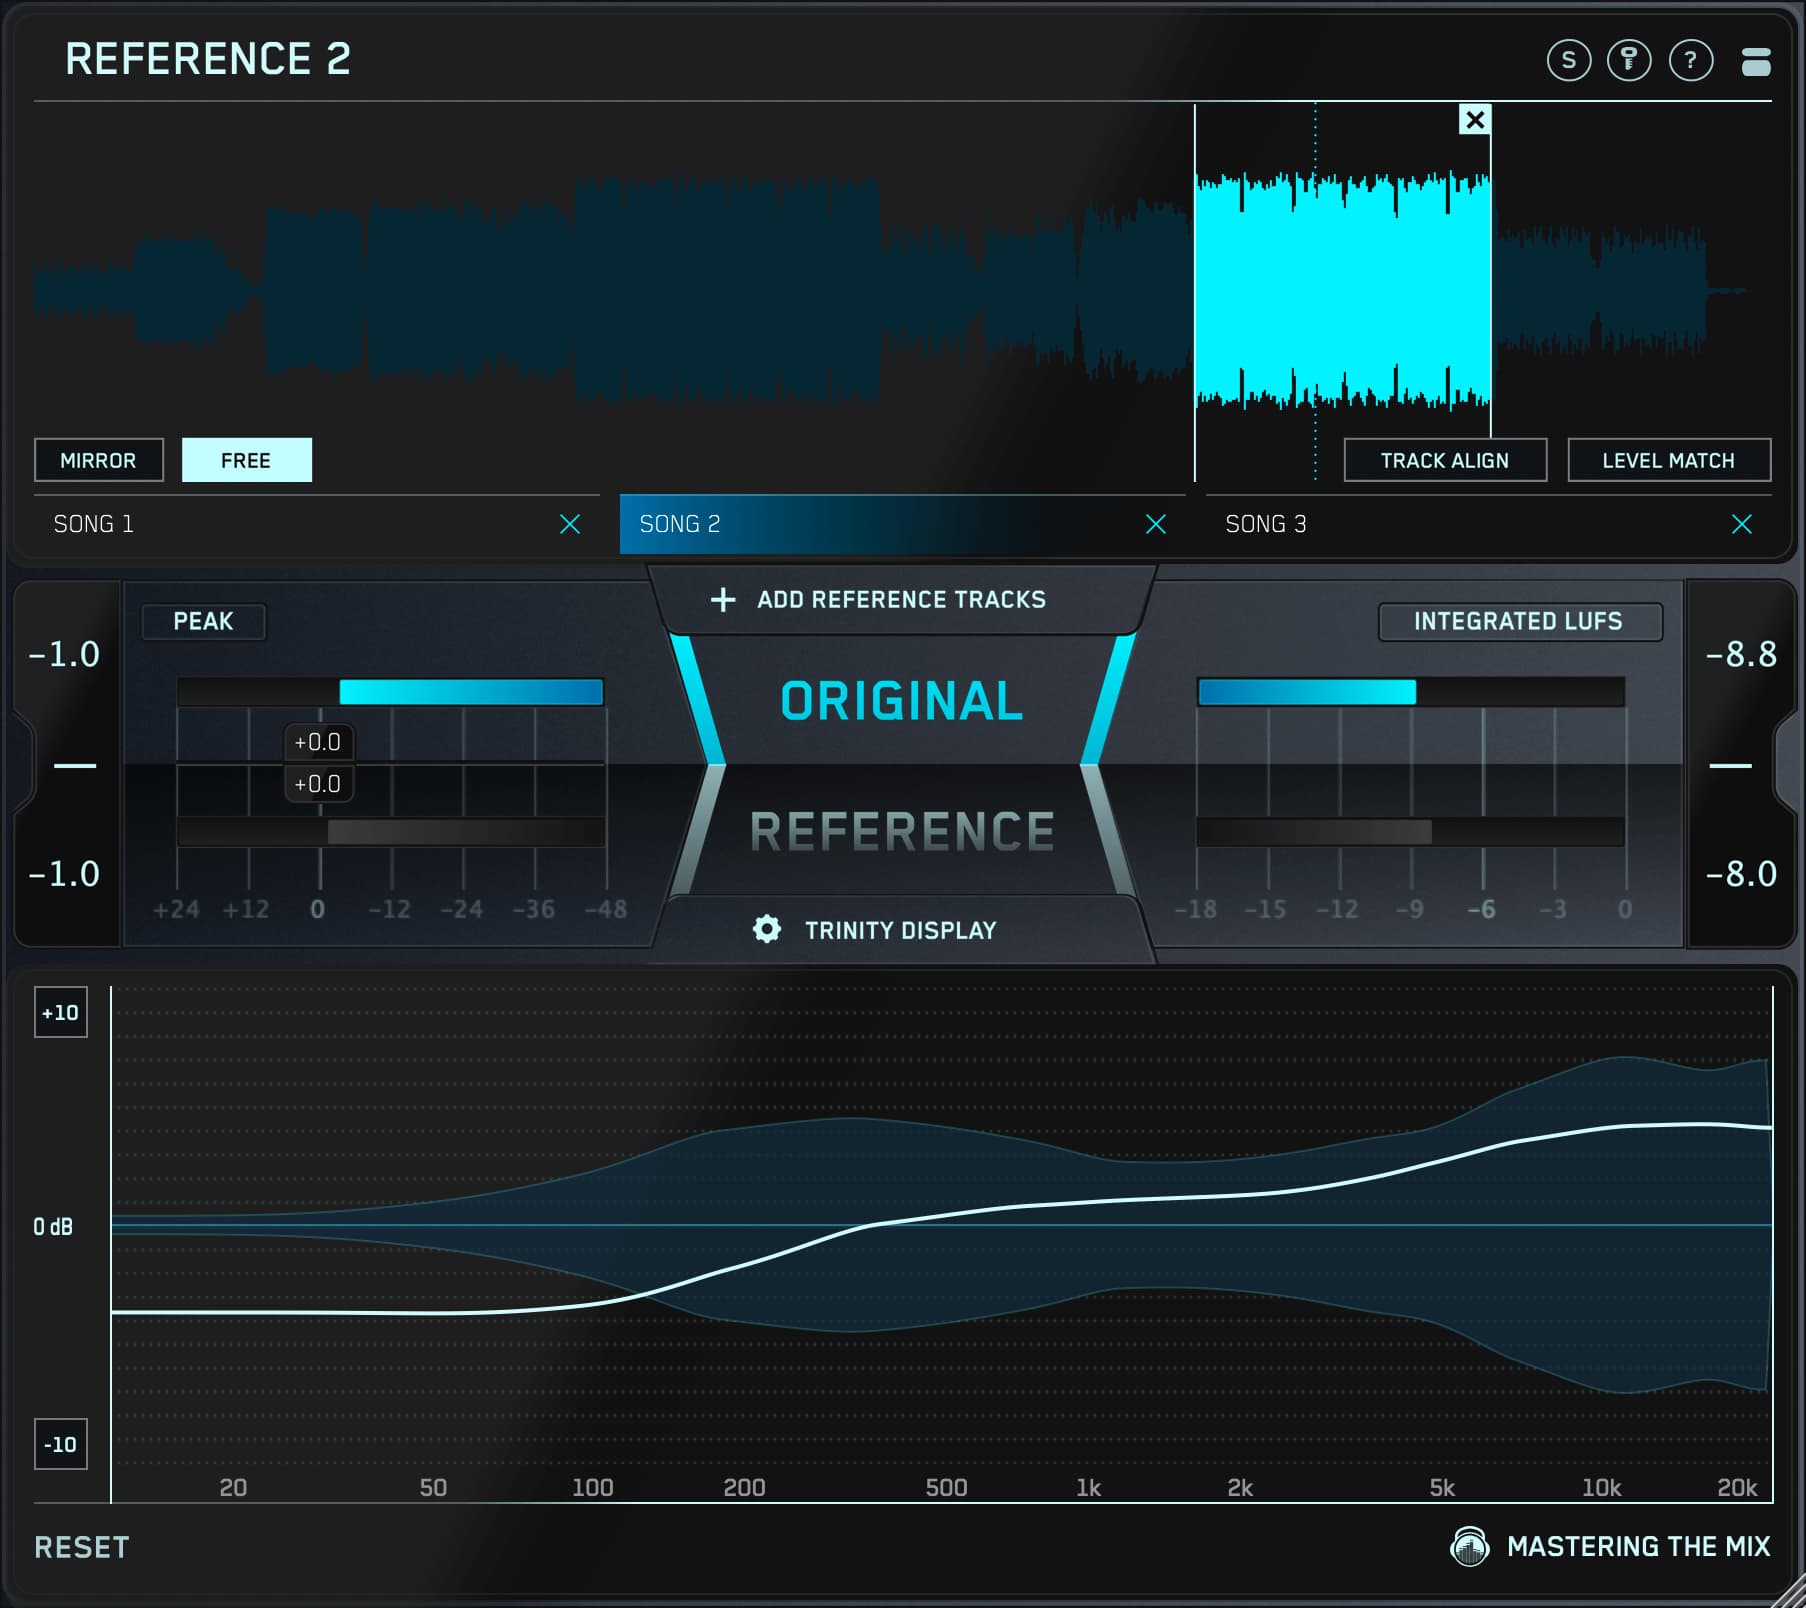
REFERENCE is an invaluable tool for critically evaluating how your low-end stands up against proven tracks. Here’s how to integrate it into your workflow:
Step 1: Load Your Reference Tracks – Import tracks into REFERENCE that are known for their exemplary low-end balance.
Step 2: Level Match – Use REFERENCE’s level-matching feature to ensure a fair comparison between your mix and the reference tracks.
Step 3: Analyze and Compare – Listen to how the low-end dynamics of your track stack up against your references. Take note of any discrepancies in balance or clarity.
Setting Optimal Reduction Levels in RESO
Using REFERENCE provides the benchmarks required to refine your low-end with RESO:
Fine-tuning with REFERENCE – With REFERENCE, identify if your low-end is overpowering or too subdued compared to your chosen tracks.
Adjusting with RESO – Return to RESO to make the necessary adjustments to your low-end nodes, tightening up frequencies for a better match.
Achieving Professional Standards
Combining REFERENCE with RESO equips you with a powerful approach to mastering low-end frequencies:
Empowered Decisions: Leveraging the analytical insights from REFERENCE empowers more informed decision-making with RESO’s adjustments.
Benchmarking: REFERENCE allows for real-time, critical comparison to tracks that represent the pinnacle of mixing and mastering, assuring you that your low-end meets industry standards.
Critical Listening: Through A/B testing with REFERENCE, you train your ears to discern nuanced differences in low-end management, improving your overall mastering capability.
By incorporating REFERENCE into your low-end refinement process, alongside strategic use of RESO, you not only ensure your mixes compete with the best but also learn critical listening and mixing skills. This holistic approach to audio production guarantees that your tracks not only sound great but also translate well across all listening environments.
In the journey of crafting music that stands out, mastering the low-end with tools like RESO and REFERENCE marks the difference between a good mix and a professional masterpiece. Through careful manipulation and critical comparison, producers can achieve a powerful, balanced low-end that translates well across all playback systems.
To wrap up, let’s highlight the key takeaways from our exploration:
Control with RESO: The targeted frequency suppression capabilities of RESO allow for precise low-end management, ensuring clarity and punch.
Analyze with REFERENCE: REFERENCE provides the critical comparison needed to ensure your mix’s low-end holds up against the best in the business.
Mastering Low-end: Mastering the low-end, both on individual tracks and the master channel, is crucial for achieving a dynamic and harmonious mix.
Learning and Growth: Utilizing these tools not only improves your current project but also enhances your mixing and mastering skills for future work.
Embarking on this low-end mastery journey equips you with the skills to produce music that resonates with depth, clarity, and professional polish. Whether you’re refining the kick and bass relationship or ensuring your master is competitive, RESO and REFERENCE are invaluable assets in your production toolkit.
If you haven’t already, we encourage you to try RESO and REFERENCE for free. Experience firsthand how these tools can transform your mixes from good to outstanding. For more insights, tips, and updates on enhancing your music production process, sign up for our newsletter. Join our community of passionate producers committed to sonic excellence.